terça-feira, 20 de outubro de 2015

Sterling File Gateway Routing Channel Template Part 1 - Communities, Groups, Partners and Mailboxes

Sterling File Gateway enables the exchange of files between partners through routing channels that are set up to connect specific partners. Partners that send files into Sterling File Gateway are referred to as producers, and those that retrieve files are referred to as consumers. A partner can be a producer, a consumer, or both from an operational standpoint.

File Gateway use mailboxes as polling system to exchange messages. The partner never communicates directly with each other. Instead the partner has to access his mailbox(s) to either retrieve or send a file.


This is important for one this should be taken into account on the creation of RTCs and second mailboxes are user independent, what exists in the system is an association between the user and the mailbox, if a user is delete all of the associated mailbox will be deleted, on the other hand there might be situations where the mailbox is to be deleted from the user, check Delete a Mailbox section bellow to see the procedure.


Create new Community


  1. To create a new community navigate to http://localhost:9090/filegateway/, on the dashboard select participants > Communities.


  1. A new window will pop-up choose add.


  1. Specify the Community name.


  1. Specify the communication protocols, this are the ways the partner can interact with FileGateway as consumers and/or producers


  1. Select the partner should receive email notifications.


  1. Review and finish.


The following table resumes the communities insert info.
Field
Description
Community Name
A meaningful name to describe the community. Required. Cannot be a name previously used in Sterling Integration Suite. Do not use spaces, tabs, or the following special characters:
! @ # % ^ * ( ) + ? , < > [ ] { } / ' \ " | ;
Secret key for PGP signing
Select from list of keys assigned to AFTPGPProfile. Required if any of the consuming partners belonging to this community require PGP signed data from the Router. *
Secret key for PGP decryption
Select from list of keys assigned to AFTPGPProfile. Required if any of the producing partners belonging to this community send PGP encrypted data to the Router. This secret key may be the same or different from the one for PGP signing. *
Partner Initiates Protocol Connections to Mailbox
Select to make this option available when creating Partners belonging to this community. A unique mailbox is created for Partners that initiate connections. Depending on other selections, submailboxes are created for Partners to enable them to drop files off for routing, or pick up files routed to them.
Partner Listens for Protocol Connections
Select to enable protocols available to listening Partners belonging to this community. When selected, the following choices are available when creating Partners belonging to this community
FTP or FTPS
Connect:Direct
SSH/SFTP
If the System Administrator adds other protocols to the AFTExtensionsCustomer.xml file, they are also provided as choices here.
Should member partners receive notifications that they are subscribed to?
This selection has no effect in Sterling File Gateway.


Create new Partner on FileGateway


Partner created here only have access to myFileGateway, to have access to FileGateway check Create a User. Always be careful on Partner creation as the internal DB transaction might not be completed, complete the procedure as with no interruption.
  1. To create a new partner navigate to http://localhost:9090/filegateway/, on the dashboard select participants > partners.


  1. Choose create.


  1. A new windows will pop-up choose the Community where you want to create the user.


  1. In the next screen the user data is inserted.
    1. Partner Name: Name displayed on the FileGateway for Groups, RTCs and Channels creation. It can have spaces and special characters it is good practice to use first and last name.
    2. Partner Code: Name used by integration server internally to identify user, make sure this var is set although it is not mandatory in some situation might cause system errors if it is not set. As a good practice use the Partner Name without spaces
    3. Address, City, Postal Code, Phone, Country: This fields are not very relevante as they are not used nor displayed elsewhere then in the FileGateway partners administration, the partner cannot change this field. Phone is mandatory.
    4. Time Zone: The system adjust the delivery time shown on myFileGateway to the time zone set here so it’s good practice to set this correctly. The user might see time displacements for delivery and create confusion.
    5. Email: The email address where myFileGateway notifications are sent to the partner.


  1. Enter information relative to user account by filling the following fieds.
    1. Authentication type: use local for partners that use the SFG internal database to store they’re login credentials. External for authentication servers implemented on SFG.
    2. User Name: the login username the partner will use  fr authetication on myFileGateway.
    3. Password: Insert a password that respects the Password Policy set.
    4. Password Policy: It is can be created on the FileGateway console, chose one from the available on the drop down list.
    5. Given Name, Surname: Names used to the welcome on myFileGateway partner interface.


  1. For external authentication the password and password policy will be retrieved from the LDAP Authentication Server (Active Directory per say).


  1. Select either if partner is producer or consumer this option doesn’t have a great impact in the system, as long as the channels are not set partner cannot produce or consume files. For option Partner will listen for a connection to consume data check the Create FTP partner section.


  1. Use the next screen if partners are required to use keys to establish SFTP connections. You can leave the default value No.


  1. Use the next screen if using PGP.


  1. Review information and hit finish.


Delete a Partner


To delete a Partner first make sure the partner is not involved in any route. If so, the partner deletion might get error and fragments of data will persist in the database. But the deletion of partners is critical to maintain the system lean and manageable it also improves performance and releases space the users might have associated with they’re mailboxes and Business Processes that use them.
  1. Check if the Partner exists in any routing channel. Both producer and consumer.


  1. Delete the channels the user is associated with.


  1. Navigate to Communities


  1. Select the community the partner is associated with and press edit.


  1. Press View.


  1. Press Delete for the user you want to delete.


  1. Press OK.


  1. The Community will show up without the delete user.


Create new Group


Groups are a very important tool in File Gateway. A correct implementation of a group can make the whole management process a whole much easier. Each group should correspond a unique set of users in a business unit. Users can belong to multiple groups but RTC cannot change the groups for producer and consumers users once they have been instantiate with a routing channel. This way always make sure the groups used in a RTC are persistent and if more users are added in the routing channels they should be added to that group, the group definition must be as consistent as possible.
Groups are also used to broadcasting. This enable a user to upload the file just to one mailbox and that file will be delivered to all the users in the target group, it enable one to many cardinality connections.
To create a new group follow the steps bellow.

  1. Navigate to Groups on File Gateway.


  1. Hit Create.


  1. Input the name of the group.


  1. A success message is displayed.  The result is an empty group.


  1. To add partners to a new created group hit added partners.


  1. Select the Group – User pair to be integrated, multiple users can be added at the same time by pressing ctrl. Press execute to complete.


  1. A report will be shown.


  1. The new user can be listed in the by pressing the group name.


Delete a Mailbox


In some situation the system doesn’t automaticly removes the Mailboxes even after the channel delition. To keep an organized interface for the end user it migh be required to delete a mailbox manually.
  1. In this scenerio a channel is deleted but the mailbox is still available for the user in myFileGateway upload menu and in the system. Start by deleting the route.


  1. It can be checked that the mailbox is still in the system.


  1. From FileGateway navigate to B2B Console.


  1. Navigate Deployment > Mailboxes > Configuration. Search the mailbox you want to delete.


  1. Hit delete for the mailbox.


  1. The system will display a series of warnings, it is a good pratice to save a backup of the community before completing the delete. Check export resources to do that. This will normally be a problem as long as the mailbox is not in use by any channel.
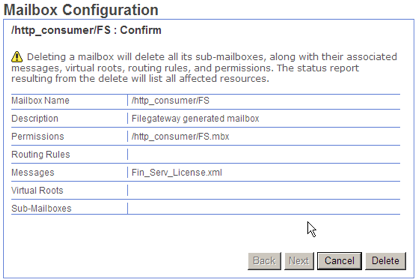

  1. A sucessfull message should appear.

sexta-feira, 16 de outubro de 2015

Sterling File Gateway - Create a New User

  1. From within IBM Sterling B2B Integrator, Select Accounts > User Accounts > Create a new Account.

  1. Fill the displayed form. If the user is not local and it is stored in Active Directory or another LDAP, that has been configured on the authentication.properties and security .properties files then it is only required to select the host and to have a user with the same username on the external account system.  For Accessibility leave the Admin UI.


  1. If SSH keys have been created they can be select to be used on user authentication.


  1. Select one or more groups from the following list:
Ø  File Gateway Integration Architects - can only access Sterling File Gateway, not myFileGateway
Ø  File Gateway Operators - can only access Sterling File Gateway, not myFileGateway
Ø  File Gateway Partner Users - can only access myFileGateway
Ø  File Gateway Route Provisioners - can only access Sterling File Gateway, not myFileGateway
Ø  File Gateway System Administrators - can only access Sterling File Gateway, not myFileGateway
A user can belong to multiple groups, but cannot belong to File Gateway Partner Users group while a member of any other group.


The picture bellow shows an overview on File Gate Way types of users and they’re available tasks.


Proceding with the user creation.


CAUTION:
To protect the security of your system, delete the default users or change the default passwords.
Note: To create an independent user that is the equivalent of fg_sysadmin, assign the Sterling B2B Integrator Admin group and all File Gateway groups except File Gateway Partner Users group to that user. Ensure that the user is not associated with any Identity (partner) that belongs to the "All Partners" group in Sterling File Gateway. Membership in a partner group prevents log in to Sterling File Gateway as an administrator.
  1. Select the permissions for the user. (Optional.) The group assignments include the standard permissions for users of each group. Also include mailbox if you want to have control over mailboxes.


  1. Fill the following form, for identity leave Default Organization and for manager ID leave empty or add one of the provided this fields do not have impact on the account functionality.


  1. Review and confirm to create the new user account.


sexta-feira, 23 de janeiro de 2015

Sterling B2B Integrator Enveloping an EDI message Part 3 - Use a Business Process for immediate enveloping

In this step we will be implementing a BP that receives a valid EDIFACT message body and outputs the enveloped document in the Document Area after the EDIFACT Envelope step.

We are using this message as the input:

UCI+200905200086+SENDER+RECEIVER+7'
UCM+905201914+IFTMBC:D:99B:UN+4++FTX'
UCS+8+15'
UCM+905201915+IFTMBC:D:99B:UN+4++FTX'
UCS+8+7'

This is a typical CONTRL message without the enveloping fields.

This is the BPEL for the BP.

And the in GPM representation bellow, note that the EDI Encoder takes the Accepter Lookup Alias, and has the mode set gas Immediate.

In the first assigns we add some elements to override envelope settings with Sender and Recipient IDs, and the interchange number, check the BPEL.

Note that both the Correlation Service and the EDI Encoder are required steps for the enveloping process.

The resulting document can be handled in services after the EDIFACT Envelope, with services like File System Adapter or whatever it is required, you can also specify a BP to be trigger once the document is enveloped.

The BP output can be seen in the next screen with the enveloped message in document area, note the interchange number as it was specified in the BPEL and overridden at the envelope level.


Sterling B2B Integrator Enveloping an EDI message Part 2 - Creating the UNH envelope

In this enveloping procedure the intermediary group (UNG) envelope will not be implement as it is not required per EDIFACT standard not it would bring any additional value to the tutorial.

We will proceed with the creation of the UNH envelope, and you can see how it is correlated with the UNB level and how the envelope chain is implemented. As in the UNB level this envelope will be implemented with a wildcard * for the sender and recipient fields, making this a generic use envelope.

The message type is again CONTRL for it's simplicity although in this case the message type doesn't make that much difference the procedure will always be the same.

1. Navigate Trading Partner > Document Envelopes > Envelopes and select New Envelope Go. Select the EDIFACT Standard.

2. Select the Outbound UNH level.


3. Give it a meaningful name GENERIC_UNH_UNT_ENVELOPE_OUTBOUND


 4. As said we are leaving the Sender ID and the Recipient ID with the wildcard *.  The envelope chain is set in the Next Envelope setting, which uses the UNB envelope build in the first part of the tutorial. One could start implementing the envelopes starting in the UNH level and selecting Create Next Envelope, this is just a way of doing it won't make any practical difference in terms of implementation.

This are the required parameters to build the envelope message.
Message Type: CONTRL
Message Version Number: 2
Message Release Number: 1
Controlling Agency, Coded: UN

There is an extra setting using in the Business Process to specify that this is the envelope that we want to use, this allows to create identical envelopes for different situations if you need so. It is used in EDI Encoder service at BP level.
Accepter Lookup Alias: CONTRL_2_1_UN

Some other field to consider. 
Limit Interchange Size -> can leave it with default settings or adjust to requirements, it's the max allowed size for interchange messages.
Use Correlation Overrides -> we want it to be Always and will be taking advantage of it on the next tutorial step in the Correlation Service.


5. Set how to generate the Reference Number.


6.  One can map and carry with both translation, validation and enveloping in the same step but this will be  out of this tutorial scope, nevertheless you can specify NONE as the map to use in the next step.

7. Select the details for message enrichment, as said in point 6. If map is NONE the values of Validate translation input and output will be ignored.


 8. Finally specify the security settings, which will be leave as none in this tutorial.

9. Confirm, Finish and proceed to step 3 of the tutorial where we are going to see how to use the enveloping in the BPs.


quinta-feira, 22 de janeiro de 2015

webMethods and other servers Java Memory Settings

The purpose of this entry is to identify the meaning of the java memory settings for the IS services/processes.

Java heap refers to the volatile part of the memory, in the context of the wM IS documents instances or service execution and other IS objects will use this part of the memory. By definition
The Java heap is where the objects of a Java program live. It is a repository for live objects, dead objects, and free memory. When an object can no longer be reached from any pointer in the running program, it is considered "garbage" and ready for collection.
and IS is very large Java program dedicated to real time message processing which means it has a very dynamic a continuously reshaping memory structure.

Has specified in the documentation Java Heap can be set in the setenv.bat/sh and there are two parameters:


JAVA_MIN_MEM  -> Defaults to 256MB

JAVA_MAX_MEM  -> Defaults to 1024MB 

The JAVA_MIN_MEM is the memory that IS is starts with, and that will be the reference to calculate the heap space available at each GC (GC) iteration.

The JAVA_MAX_MEM refers to max memory the IS will use before triggering the garbage collector.


  • Why not to keep this values the same?
If this values are the same then the JVM will have a constant value for the heap memory, the disadvantage of this is that the GC takes more time to collect the death objects the bigger the heap is, in the limit IS might become irresponsive.

Lower heap might conduct to shorter GC while big heaps can lead to longer GC but less frequent.

Why not to keep JAVA_MIN_MEM to zero?

Because it takes resources to increase the heap size, the configuration as suggested is to use the lowest required memory at any time by the IS for the JAVA_MIN_MEM, and the biggest to the JAVA_MAX_MEN.


There is another memory component, the perm or permanent space, this is were the .class files are stored, it is the object factory that allows the generation of the instances used during runtime. 


By analogy you can compare heap space to the RAM in you're computer and the perm space to the hard drive. In wM terms I would say heap space is for run time memory requirements while perm space is related to services/documents/processes design.

The total amount of memory used in the OS will be the sum of 3 components, java heap + java perm + other (which is the smaller portion and is mostly related to JVM internal requirements to keep the java engine running).


  • Finally, why do we get the following errors?


  1. Out of memory error:java perm space
  2. Out of memory error:java heap space


1 Is quite easy to assert and you might see it happen on the wM IS env if you keep the default settings, as one build more packages and services, the available perm memory will be less and less at each new development until at last the space available to allocate new classes is not enough and we get the error number 1.

2 Is a bit more complex, the error is thrown when the garbage collector is unable to free up enough space to allow allocation to the requested object.

So basically when a new object is to be created and there is not enough space in the heap, the jvm will invoke the garbage collector. If after the gc completion, there is still not enough space freed up, then the jvm throws an OutOfMemoryError: java heap.

In highly inaccurate but comprehensive description if you have capacity to run 1000 IS services instances, when the heap reaches the 1000 services the GC will be started, if only 100 services instances are cleared and there are 200 in the queue voilá you have a java singularity :p and the error number 2 is triggered.

That's all good luck with you're machines tuning and will appreciate comments ;)

Some references:
Official wM documentation of course ;)
https://plumbr.eu/outofmemoryerror/java-heap-space
http://www.yourkit.com/docs/kb/sizes.jsp
http://www.coderanch.com/how-to/java/InvestigateOutOfMemoryError
http://www.coderanch.com/t/537313/Performance/java/memory-error-java-heap-space