
Lab01 BPs 101
Objectives
Understand the
basics on how to create and run a Business Process in SterlingB2B.
Overview
This labs are set up to be run on windows systems.
The lab involves the following tasks:
- Start the server and logging in.
- Creating a BP in GPM
- Deploy the BP in SB2B
- Run and debug the BP
1.1 Starting
the Server
- Navigate to the install directory normally under -
/opt/IBM/SterlingIntegrator/install/bin/
- Execute the scrip ./run.sh

- It
will deliver more debug info (it’s a verbose run) in case of sucess the
following should be displayed.

- To stop the server there are two approaches and both can be done
running scripts or through the web interface.
- Hardstop: will stop all running services and
transactions immediately which might result in data losses, avoid using
this in production environments. Run the ./hardstop.sh script under the
same directory.

- Softstop: More suitable for production
environments but that might be unable to stop the server under certain
circumstances. Run the ./sotstop.sh script.
- Stopping SB2B using the web interface.
1.2 Logging
into Sterling B2B Integrator
- Log in to Sterling B2B Integrator
- Start Internet Explorer and use the URL: http://localhost:9090/dashboard to reach the Sterling B2B Integrator server
- Enter admin
as the user name
- Enter password
as password
- Click Sign In

1.3 Download
and run the GMP
- Navigate to Business Process > Manage
- Click Go on Run Graphical Process Modeler

- Download the ProcessModeler.jnlp
file.
- Open it using the ibm_jdk javaws.exe,
note that it will not work with Oracle Java versions.

§ ProcessModeler.jnlp can be dragged and dropped over javaws.exe so there is no need to change the default java start settings.
1.4 Log
in to the GPM
- The GPM uses the same credentials as the SB2B web interface, if a
BP is deployed it will be available for the priviledges of the user who
created it (the same being used to log in).
- Log in to GPM
- The login window migh be in the background so minimize you’re open
tasks.On startup it doesn’t show up in the taskbar.
- Enter admin
as the user name
- Enter password
as password
- Click OK

1.5 Create
a new BP file
- From the GMP top menu navigate to File > New

- Navigate File > Save As
and save file as Lab01_101.bp
- Chose no to Validate on Save

- Create a new folder on BPs and open it and hit Save.

1.6 Show
the BPML and All Services Stencil
- Navigate to View >
Stencil > BPML
- Navigate and press View >
Stencil > All Services

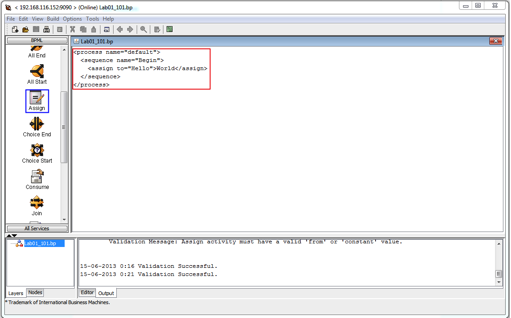
1.7 Create
the Business Process Workflow
- Drag and drop elements from the BPML stencil to create a BP as shown bellow.

- Connect the BPML elements by pressing the output arrows and
dragging them to the next element.
- Fill the values of the Assign activity by clicking on top of it
- Leave append as false.
- Set constant as World
- Set to as Hello

- Save the BP hiting save icon. Press Yes on Validate on Save.
A Validation Successful message
should appear.

- Change the Sequence Start element name by entering Begin in the Value inputbox.

- Save the BP.
1.8 View
the BPML source of the BP
- Navigate again to the Graphical interface by choosing View > Graph from the top menu.
1.9 Deploy
the BP using one of the 3 options
1.9.1 Deploy
BP using the GPM
- Navigate and select Tools
> Source Manager
- Click the folder icon

- Insert Lab01_101 as Process
Name

- Click the ... button and
search the BP previously created, add a Description and click Next.

- Leave the configuration for the BP on the default values
- Click next on Process
Levels
- Click next on Deadline Settings
- Click next on Life Span

- Confirm the input and make sure the Enable Business Process is
check (this will make the BP available for execution).

1.9.2 Delete
the Business process
- Before proceding to other BP upload options delete the BP deployed
on the previous point.
- Login to SB2B dashboard
- Navigate to Business Process
> Manager
- Click Go after entering
Lab01_101 under Search > Process
Name

- Click Source Manager

- Hit Go after Delete All Versions

- In this Panel it is also possible to update existing BPs or check in a
new version of the Business Processs.
- Instead of deleting all version one could have selected the Delete Select Versions
- You can also Check Out the
BP making it available for editing on the GPM or to import it to another
Sterling Server.
- Click Ok to the pop up
prompt window
- Hit Next on the Delete
Resources info window.

- Click Delete on the warning window.

1.9.3 Import
service to SB2B using the web interface
- Login to SB2B dashboard
- Navigate to Business Process
> Manager
- Click Go under Create >
Process Definifion

- Give the process name Lab01_101, make sure you have the Check in Business Process created by
the graphical modeling tool radio selected.
- Hit next.

- The two info boxes assinaled in red, these are common to all Sterling
forms when setting up configurations using the dashboard.
- The first one provides help hints related to the current configuration
- The second provides a navigation breadcrumb on the current
configuration
- Both are updated in each interaction of the form
- Fill the second form
- Hit Search and locate the
previously BP create with GPM
- Enter a Description
(mandatory)
- Click Next

- Notice the Help and Steps info boxes have been updated
for the current form step.
- Leave defaults on the next three steps
- Click next on Process
Levels
- Click next on Deadline Settings
- Click next on Life Span

- These inputs are advanced topics and are out of context for the
current lab obkectives
- The configurations don’t have any impact on how the BP runs and refer
to how SB2B manages the BP internally
- Confirm the input and make sure the Enable Business Process is check
(this will make the BP available for execution).

- Success message is displayed, click Return.

- Delete the created BP using the Sterling Web Dashboard
1.9.4 Import
service to SB2B using the web interface and BPML
- Login to SB2B dashboard
- Navigate to Business Process
> Manager
- Click Go under Create >
Process Definifion

- Give the process name Lab01_101, make sure you have the Business Process Text Editor radio
selected

- Change to the GPM application and navigate to View > Source

- Copy the BPML source
- Go back to the browser on Sterling Dashboard
- Paste the copied code from GPM on the Business Process text area
- Enter a Descrition

- Leave defaults on the next three steps
- Click next on Process
Levels
- Click next on Deadline Settings
- Click next on Life Span

- These inputs are advanced topics and are out of context for the
current lab obkectives
- The configurations don’t have any impact on how the BP runs and refer
to how SB2B manages the BP internally
- Confirm the input and make sure the Enable Business Process is
check (this will make the BP available for execution).

- Success message is displayed, click Return.
1.10 Run/Execute
the Business Process
- Login to SB2B dashboard
- Navigate to Business Process
> Manager
- Click Go after entering
Lab01_101 under Search > Process
Name
- Click Execution Manager

- Hit Execute for the
displayed version


- Leave the Business Input empty and click Go

- Wait for the results to display

- Each row of the table corresponds to a service/activity being
executed in the Business Process
- The process is shown starting at the bottom and ending in the top
step 0->1
- The Status report column contains information about errors
- The Document column refers to the Document Area and will be
populated if there are documents being transported/translated on the BP
workflow
- The instance Data refers to the internal BP control vars, or Process Data where information
required to execution of the BP and the translation and flow of the
documents is stored. It can be result of SQL queries, XPath, java functions,
virtually any function provided by an advance programming language. It is
advisable to use always the existing Sterling Services it avoids to
reinvent the wheel and make the maintenance easy as new patches might
improve those services.
- Click the info icon with
the ! mark

- The Process Data is
display as the result of the Assign Service execution
- Process Data is an XML document with tags that
contain values
- The result is a tag
<Hello>World</Hello>
- The Message To Service
and Message From Service are empty
as there is no data coming in or from the service
I really appreciate information shared above. It’s of great help. If someone want to learn Online (Virtual) instructor lead live training in IBM STERLING B2B INTEGRATOR kindly contact us http://www.maxmunus.com/contact
ResponderEliminarMaxMunus Offer World Class Virtual Instructor led training on IBM STERLING B2B INTEGRATOR We have industry expert trainer. We provide Training Material and Software Support. MaxMunus has successfully conducted 100000+ trainings in India, USA, UK, Australlia, Switzerland, Qatar, Saudi Arabia, Bangladesh, Bahrain and UAE etc.
For Demo Contact us.
Saurabh Srivastava
MaxMunus
E-mail: saurabh@maxmunus.com
Skype id: saurabhmaxmunus
Ph:+91 8553576305 / 080 - 41103383
http://www.maxmunus.com/