sexta-feira, 24 de outubro de 2014

Oracle DB Using the GREATEST function with null dates/values

The GREATEST function allows to compare values of different n columns.

According to Oracle documentation:

GREATEST returns the greatest of the list of one or more expressions. Oracle Database uses the first expr to determine the return type. If the first expr is numeric, then Oracle determines the argument with the highest numeric precedence, implicitly converts the remaining arguments to that datatype before the comparison, and returns that datatype. If the first expr is not numeric, then each expr after the first is implicitly converted to the datatype of the first exprbefore the comparison.
Oracle Database compares each expr using nonpadded comparison semantics. The comparison is binary by default and is linguistic if the NLS_COMP parameter is set to LINGUISTIC. Character comparison is based on the numerical codes of the characters in the database character set and is performed on whole strings treated as one sequence of bytes, rather than character by character. If the value returned by this function is character data, then its datatype is alwaysVARCHAR2.
 And this are some sample usages:

GREATEST(2, 5, 12, 3)
Result: 12

GREATEST('2', '5', '12', '3')
Result: '5'

GREATEST( 09/21/2013, 01/02/2012, 09/21/2013) -- columns typed as dates
Result: 09/21/2013

GREATEST('apples', 'applis', 'applas')
Result: 'applis'
The problem emerges when trying to a null value:

GREATEST( 09/21/2013, NULL, 09/21/2013) -- columns typed as dates
Result: NULL            

GREATEST('apples', 'applis', NULL)
Result: NULL            
To avoid this you can use the NVL() function that replaces a NULL value with a string. If you are handling dates then after that conversion you still need to convert it to_date(). This is the query that will work if you're business only requires dates bigger than 1900-01-01.


Col A         Col  B          GREATEST_DATE
---------------------------------------
 NULL          NULL            NULL
 09-21-2013    01-02-2012      09-21-2013
 NULL          01-03-2013      01-03-2013 
 01-03-2013    NULL            01-03-2013
Col A         Col  B          GREATEST_DATE
---------------------------------------
 NULL          NULL            1900-01-01
 09-11-2013    01-02-2012      09-11-2013
 NULL          01-03-2013      01-03-2013 
 01-03-2013    NULL            01-03-2013

quarta-feira, 17 de setembro de 2014

webMethods Creating a business process with a task for approval Part 4 Update the business process and create a UI for the PO

Before continuing with this tutorial we'll be changing the published document in first part, instead of publishing the full content of the purchase order we'll be sticking to the PO number. We don't need to create this overhead on the process, it is good practice to only publish the metadata required to make the process working. In this case we only need the PO number all the other data can be accessed with this value from the database, remember BPM engine is not suitable to store data, add the least possible data in between activities and/or for process starting.

Next we are going to identify our business process logged custom id so that there is a relation between the process and the work order this is quite useful in practical scenarios and I use a small trick to achieve that will be showing bellow.

Finally we are going to create a UI portlet to display the PO data, this is another good practice method. This way instead of creating the same display in different tasks. Allot of times you need to show the same data in different task along extensive processes it is not developer friendly to make the same UI over and over the different tasks, instead we just use one portlet that gets parameters to display data, this are template portlets.

1.  Change the PublishPurchaseOrder to only publish the PurchaseOrderNumber field. We are doing this by dropping all other fields in a map step after data has been mapped to the database.


2.  Edit the PurchaseOrder document to have PurchaseOrderNumber as the only mandatory field. Do this by changing all the fields to required = false and if required make the document Linked to source = false. Also include a new field Approved that will hold the database variable for PurchaseOrder to be set accordingly to the task submission value (to be implemented later), this field is also non mandatory.


3.  To change the BP name first we are using the PRT customId log service available in the PUB package we will need to pass the value of the PO number to it. Create a folder utils under services and place the place the following BP on it.


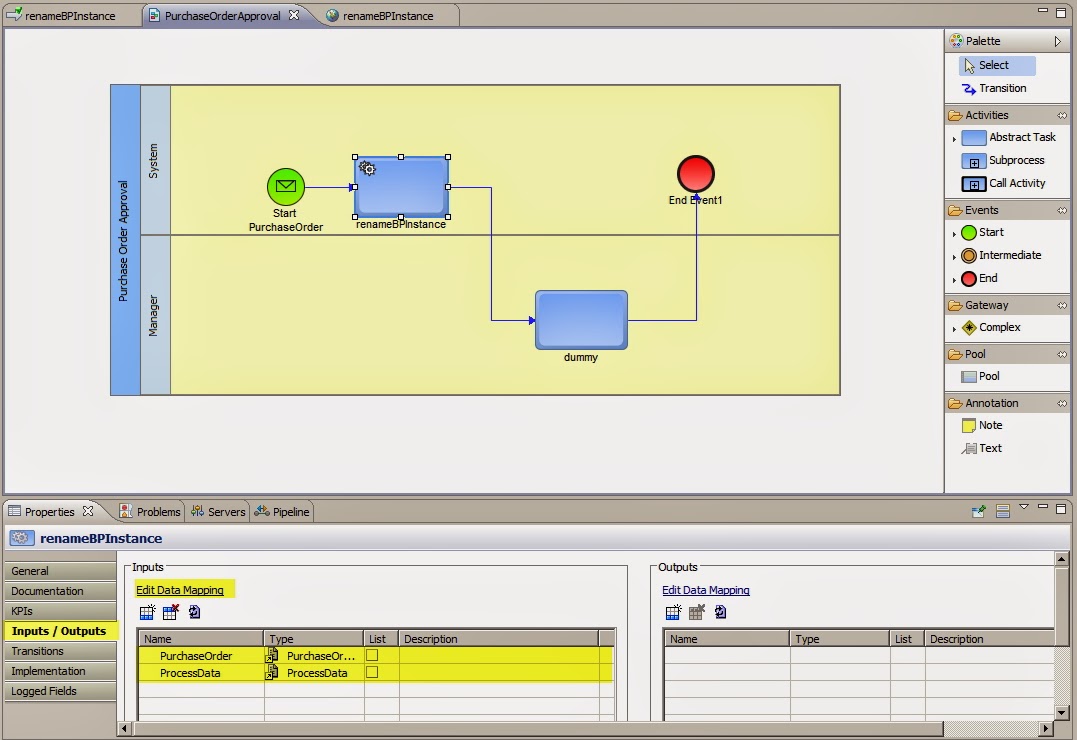
4.  Place this service as the first step of the PurchaseOrderApproval process. After opening the process switch to service view and drag the renameBPinstance. Make the connection as shown bellow, select the renameBPInstance activity and click Inputs/Outputs, check that PurchaseOrder and ProcessData documents are there.

Clicking Edit Data Mapping allows to map the process variables with the service inputs. The BPM engine will dynamically choose the most likely connections possible. 


5.  Rebuild the process and make a new request to deliverPurchaseOrder WS. Now the process instance will have a custom defined and searchable name.

6. On this last section we are generating the template for Purchase Order View. Start by changing to the UI Development perspective and second mouse click over User Interfaces > New Portlet Application follow the steps as documented in the screens bellow.


7.  Second mouse click over the PurchaseOrderApprovalPortlets folder under User Interfaces and select New Portlet. Follow the screens bellow to complete the portlet creation.


8.  We can finally start building the Purchase Order Details View. The first step is to create the select adapters under the adapters folder on the IS Demo_POApprovalProcess package.


9.  Having the adapters create a Business Process that will be responsible to populate a PurchaseOrder document. The definition is displayed bellow, it only receives the PurchaseOrderNumber as input and delivers a PurchaseOrder document that will the response to a WS defined in the next step.


10.  To make this service available to the portlet we need to generate a WS descriptor (getPurchaseOrder). Follow the same steps as described on the deliverPurchaseOrder_wsd. Make sure it is working once it has been implemented.


11.  To use the WS just drag and drop the getPurchaseOrder_wsd to the PurchaseOrderDetail default view. This will open a wizard that can be filled displayed bellow, this is basically generating the bean structure and the request interface in the portlet definition.


Once you completed the wizard the following structure should be displayed in the PurchaseOrderDetail default view, this is the default display in a view for a input/output WS Descriptor. You can see on the Bindings there is a Managed Bean structure that holds all the fields related to the WS. Later (on the next part) we will see how to dynamically use the bean inputs.


11.  Test the final deployment by running the portlet on MWS. You will require sysadmin permissions to do so and first the portlet needs to be deployed in the MWS server. To do so switch to the Servers tab, second mouse button over the server you are using click Add and Remove... and include the PurchaseOrderApprovalPortlets to the right side under configurable this will make the portlet publishable (that normally Eclipse will handle it automatically).


12.  Finally test the deployment by clicking the run button, this will open a new tab, you can either proceed with login (using sysadmin or equivalent credentials) or copy the link and open it in another browser.
 Notice the Refresh button at the bottom of the portlet.

13.  Finally rearrange the document structure to seem a bit more like a real world implementation this is the layout I have defined. Play a bit with this and note that you can drag the inputs from the bindings window and it will reflect in a input text box / display.


On the next part we will see how to use this view in a task and how to use the task in the business process and how it all connects together.


terça-feira, 12 de agosto de 2014

webMethods Creating a business process with a task for approval Part 3 Create a database structure to hold the PurchaseOrder

We will want to display the purchase order content to our manager to approve it. There are two ways to do this:

 - You can pass the document in between activities in the BPM flow, but I really don't recommend this approach, it creates a big load on BPM engine and it only supports a small amount of MBs, depending on you're system, you might try to crash the system by generating a 10MB or more PurchaseOrder and try to feed it to activities in the process, normally a PurchaseOrder shouldn't be this big but there are allot of document that include pictures and can get quite big. Bottom line is store you're PurchaseOrder (or whatever input document is there) to a database.

- Second approach is store the document in a database, we are using standard relational database, you could use a non SQL database but this is a PurchaseOrder and probably in real world applications you might want to query it in relation to multiple other tables from other system and relational databases are really much more flexible in terms of queries.

1. We are going for second option the first thing is to generate the relational model, from our document/xml (check the XMLSpy tabular form). We can see that there are two one to many relations from the PurchaseOrder with Items and Address elements. This will have an external key to the PurchaseOrderNumber that will be a primary key in a top relational table PurchaseOrder.


The relational model diagram using MS SQL Server 2008 and SQL Management Studio could be modelled like bellow. Note that an extra field was added to the PurchaseOrder table, Approved, this will be the field to be changed on manager approval, by default this field will be set to No


2. To generate this model first create a database in MS SQL, this is just for the demo so we are leaving the default values.


Note on the top comments of each section.


3.  Once the database structure has been created we can now proceed to develop the adapters to insert the PurchaseOrder document in the database once it has been received by the exposed web service and before it is published to the broker.


The folder structure of the package has been changed to receive the adapters, we are using standard wM adapters to insert values in the table, this kind of a trivial process so it is being skipped.

4. Once the adapters have been created generate a service Demo_POApprovalProcess.services.db:createPurchaseOrder that will be responsible for inserting a full PurchaseOrder to the database. Note that the transaction is implicit as the JDBC connector is set LOCAL_TRANSACTION.


5. Change the service Demo_POApprovalProcess.services:publishPurchaseOrder created in Part 1 to include the previous service just before the document is published.


6. Use SOAP UI to call of the WS (as shown in Part 1) and check that the fields are inserted in the database.


Now that there is a database structure to work with we can start using the task engine and the some CAF to display a the data for the manager to approve. 


quarta-feira, 6 de agosto de 2014

webMethods Creating a business process with a task for approval Part 2 Create a Dummy Process to triggered by the PurchaseOrder submission

 On this second part of webMethods BPM/Task Engine tutorial we are going to invoke the previously created web service to start a Process in webMethods with a simple Dummy task this will enable to progressively increment the level of complexity. Note that we are not going to explore BPM governance nor problem resolution this a tutorial for beginners that now they're way on IS but don't have experience on BPM.

1. Start by creating a new Process in Designer. If you don't have the Process view available in the top shortcut tabs hit the left most icon and look for Process Development.


Now you can select that view and on the left pane create a new Process Project by right clicking the Processes folder and clicking the new Process Project. Name you're process whatever you want but in real life it should have a designation related with the business unit the children processes will be related to.


After this the newly created Process Project folder can be used to create our process by second mouse button on it. This is a key component in process development organization, Processes Projects are our packages for Processes

The final structure should look something like this.


 2. Create a new process definition. If this is the first time you are creating a Process you might want to change from Business Analyst (blue) perspective to Process Developer (purple) otherwise you won't have access to the Implementation tab in the activities Properties tab.


Using the palette create a Process, I am using a pool with two lanes one will be for system and the second one for the Manager (at this time we are still not creating user tasks but this will be later assigned to a fictitious user). Also drag a start and end activity as well as an abstract class (that we are renaming to dummy at this time we just want to check the process has started and that we can monitor it on MWS).

The screen before is quite explicitly on the process design.

3. Enable the subscription of documents from the broker. To do this go to the Implementation tab and set Receive Protocol  for Subscription(For Broker Documents), this will enable that any document type specified on the Receive Document parameter, whenever is published to the broker, it will immediately  start a new process instance (of course there are filters that can be applied to fields on the received document).


4. Finally we need to build and upload the process, just click the icon on the picture bellow and everything is ok the process will be deployed to IS and also be visible on MWS.


This is how the Build Report should look.


5.Check that the process is upload in MWS and IS.

In the IS the BPM engine will generate a package. With a trigger for the transaction and one for the PurchaseOrder broker subscription. Yeap wM does all this background work to enable the BPM feature wMPRT is one of the packages responsible for this, this is a strong reload candidate whenever there is some anomalous BPM functionality.


On MWS when navigating to Administration > Business Processes the uploaded process should be available here, make sure the Execution is enabled. 


If you are new to BPM I strongly advise to play around and create more complex processes, try to drag a service from the IS and see what happens, add more tasks and check how the IS package was changed.

6. Finally lets test if everything is working correctly. Using the same procedure as explained in part 1 run the SOAP UI (or other interface to call the WS). If things are working correctly you should be able to navigate (in MWS with Administrator account) to Monitoring > Business > Process Instances  and see a BP instance available, you might have to hit search.


If you click detail you should an extensive page that will resume the process execution status.


Well folks that's it for this part.