Before continuing with this tutorial we'll be changing the published document in first part, instead of publishing the full content of the purchase order we'll be sticking to the PO number. We don't need to create this overhead on the process, it is good practice to only publish the metadata required to make the process working. In this case we only need the PO number all the other data can be accessed with this value from the database, remember BPM engine is not suitable to store data, add the least possible data in between activities and/or for process starting.
Next we are going to identify our business process logged custom id so that there is a relation between the process and the work order this is quite useful in practical scenarios and I use a small trick to achieve that will be showing bellow.
Finally we are going to create a UI portlet to display the PO data, this is another good practice method. This way instead of creating the same display in different tasks. Allot of times you need to show the same data in different task along extensive processes it is not developer friendly to make the same UI over and over the different tasks, instead we just use one portlet that gets parameters to display data, this are template portlets.
1. Change the PublishPurchaseOrder to only publish the PurchaseOrderNumber field. We are doing this by dropping all other fields in a map step after data has been mapped to the database.


3. To change the BP name first we are using the PRT customId log service available in the PUB package we will need to pass the value of the PO number to it. Create a folder utils under services and place the place the following BP on it.


 Notice the Refresh button at the bottom of the portlet.

13. Finally rearrange the document structure to seem a bit more like a real world implementation this is the layout I have defined. Play a bit with this and note that you can drag the inputs from the bindings window and it will reflect in a input text box / display.

Next we are going to identify our business process logged custom id so that there is a relation between the process and the work order this is quite useful in practical scenarios and I use a small trick to achieve that will be showing bellow.
Finally we are going to create a UI portlet to display the PO data, this is another good practice method. This way instead of creating the same display in different tasks. Allot of times you need to show the same data in different task along extensive processes it is not developer friendly to make the same UI over and over the different tasks, instead we just use one portlet that gets parameters to display data, this are template portlets.
1. Change the PublishPurchaseOrder to only publish the PurchaseOrderNumber field. We are doing this by dropping all other fields in a map step after data has been mapped to the database.
2. Edit the PurchaseOrder document to have PurchaseOrderNumber as the only mandatory field. Do this by changing all the fields to required = false and if required make the document Linked to source = false. Also include a new field Approved that will hold the database variable for PurchaseOrder to be set accordingly to the task submission value (to be implemented later), this field is also non mandatory.
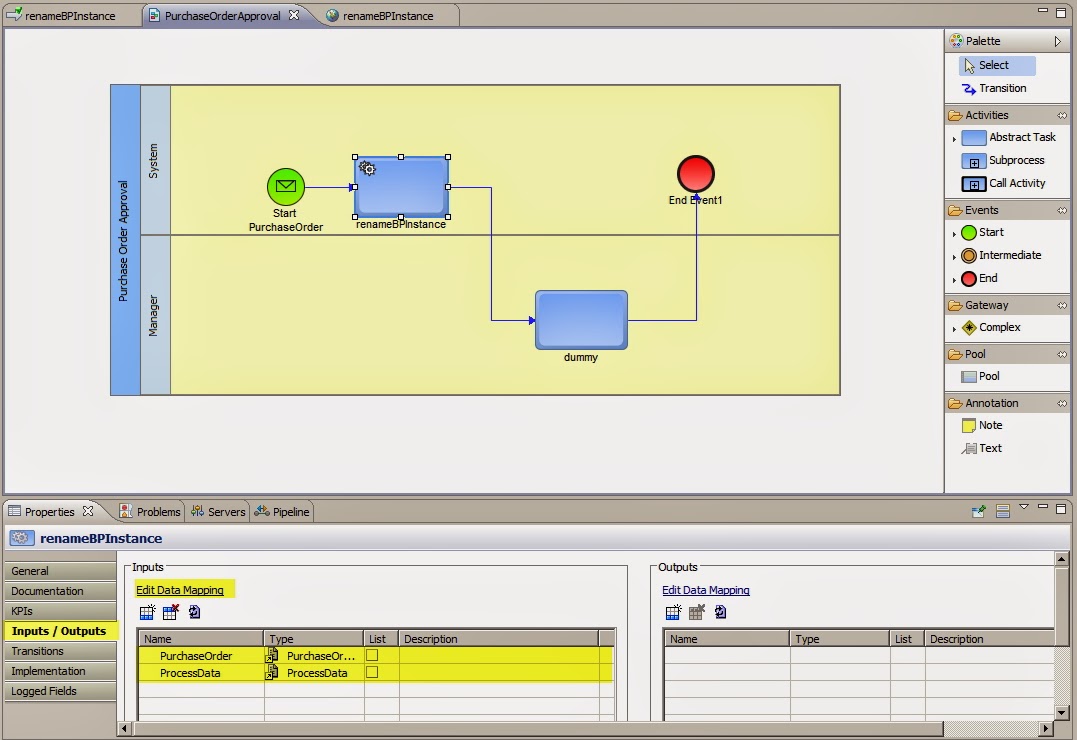
3. To change the BP name first we are using the PRT customId log service available in the PUB package we will need to pass the value of the PO number to it. Create a folder utils under services and place the place the following BP on it.
4. Place this service as the first step of the PurchaseOrderApproval process. After opening the process switch to service view and drag the renameBPinstance. Make the connection as shown bellow, select the renameBPInstance activity and click Inputs/Outputs, check that PurchaseOrder and ProcessData documents are there.
Clicking Edit Data Mapping allows to map the process variables with the service inputs. The BPM engine will dynamically choose the most likely connections possible.
5. Rebuild the process and make a new request to deliverPurchaseOrder WS. Now the process instance will have a custom defined and searchable name.
6. On this last section we are generating the template for Purchase Order View. Start by changing to the UI Development perspective and second mouse click over User Interfaces > New Portlet Application follow the steps as documented in the screens bellow.
7. Second mouse click over the PurchaseOrderApprovalPortlets folder under User Interfaces and select New Portlet. Follow the screens bellow to complete the portlet creation.
8. We can finally start building the Purchase Order Details View. The first step is to create the select adapters under the adapters folder on the IS Demo_POApprovalProcess package.
9. Having the adapters create a Business Process that will be responsible to populate a PurchaseOrder document. The definition is displayed bellow, it only receives the PurchaseOrderNumber as input and delivers a PurchaseOrder document that will the response to a WS defined in the next step.
10. To make this service available to the portlet we need to generate a WS descriptor (getPurchaseOrder). Follow the same steps as described on the deliverPurchaseOrder_wsd. Make sure it is working once it has been implemented.
11. To use the WS just drag and drop the getPurchaseOrder_wsd to the PurchaseOrderDetail default view. This will open a wizard that can be filled displayed bellow, this is basically generating the bean structure and the request interface in the portlet definition.
Once you completed the wizard the following structure should be displayed in the PurchaseOrderDetail default view, this is the default display in a view for a input/output WS Descriptor. You can see on the Bindings there is a Managed Bean structure that holds all the fields related to the WS. Later (on the next part) we will see how to dynamically use the bean inputs.
11. Test the final deployment by running the portlet on MWS. You will require sysadmin permissions to do so and first the portlet needs to be deployed in the MWS server. To do so switch to the Servers tab, second mouse button over the server you are using click Add and Remove... and include the PurchaseOrderApprovalPortlets to the right side under configurable this will make the portlet publishable (that normally Eclipse will handle it automatically).
12. Finally test the deployment by clicking the run button, this will open a new tab, you can either proceed with login (using sysadmin or equivalent credentials) or copy the link and open it in another browser.
On the next part we will see how to use this view in a task and how to use the task in the business process and how it all connects together.
Sem comentários:
Enviar um comentário