Sterling File Gateway enables the exchange of files between partners
through routing channels that are set up to connect specific partners. Partners
that send files into Sterling File Gateway are referred to as producers, and
those that retrieve files are referred to as consumers. A partner can be a
producer, a consumer, or both from an operational standpoint.
File Gateway use mailboxes as polling system to exchange messages. The partner never
communicates directly with each other. Instead the partner has to access his
mailbox(s) to either retrieve or send a file.

This is important for one this should be taken into account on the creation
of RTCs and second mailboxes are user independent, what exists in the system is
an association between the user and the mailbox, if a user is delete all of the
associated mailbox will be deleted, on the other hand there might be situations
where the mailbox is to be deleted from the user, check Delete a Mailbox section bellow to see
the procedure.
Create new Community
- To create a new community navigate to http://localhost:9090/filegateway/,
on the dashboard select participants
> Communities.

- A new window will pop-up choose add.

- Specify the Community name.

- Specify the communication protocols, this
are the ways the partner can interact with FileGateway as consumers and/or
producers

- Select the partner should receive email notifications.

- Review and finish.

The following table resumes the communities insert info.
Create new Partner on FileGateway
Partner created here only have access to myFileGateway, to have access to
FileGateway check Create a User.
Always be careful on Partner creation as the internal DB transaction might not
be completed, complete the procedure as with no interruption.
- To create a new partner navigate to http://localhost:9090/filegateway/, on the dashboard select participants > partners.

- Choose create.

- A new windows will pop-up choose the
Community where you want to create the user.

- In the next screen the user data is
inserted.
- Partner
Name: Name displayed on the FileGateway for Groups, RTCs and Channels
creation. It can have spaces and special characters it is good practice
to use first and last name.
- Partner
Code: Name used by integration server internally to identify user, make
sure this var is set although it is not mandatory in some situation might
cause system errors if it is not set. As a good practice use the Partner Name without spaces
- Address,
City, Postal Code, Phone, Country: This fields are not very relevante as
they are not used nor displayed elsewhere then in the FileGateway
partners administration, the partner cannot change this field. Phone is
mandatory.
- Time
Zone: The system adjust the delivery time shown on myFileGateway to the
time zone set here so it’s good practice to set this correctly. The user
might see time displacements for delivery and create confusion.
- Email: The email
address where myFileGateway notifications are sent to the partner.

- Enter information relative to user account by filling the following
fieds.
- Authentication type:
use local for partners that use the SFG internal database to store they’re
login credentials. External for authentication servers implemented on
SFG.
- User Name:
the login username the partner will use
fr authetication on myFileGateway.
- Password: Insert a password that respects the Password Policy set.
- Password Policy:
It is can be created on the FileGateway console, chose one from the
available on the drop down list.
- Given Name, Surname:
Names used to the welcome on myFileGateway partner interface.

- For external authentication the password
and password policy will be retrieved from the LDAP Authentication Server
(Active Directory per say).

- Select either if partner is producer or
consumer this option doesn’t have a great impact in the system, as long as
the channels are not set partner cannot produce or consume files. For
option Partner will listen for a
connection to consume data check the Create FTP partner section.

- Use the next screen if partners are
required to use keys to establish SFTP connections. You can leave the
default value No.

- Use the next screen if
using PGP.

- Review
information and hit finish.

Delete a Partner
To delete a Partner first make
sure the partner is not involved in any route. If so, the partner deletion
might get error and fragments of data will persist in the database. But the
deletion of partners is critical to maintain the system lean and manageable it
also improves performance and releases space the users might have associated
with they’re mailboxes and Business Processes that use them.
- Check if the Partner exists in any routing
channel. Both producer and consumer.


- Delete the channels the user is associated
with.

- Navigate to Communities

- Select the community the partner is associated with and press edit.

- Press View.

- Press Delete
for the user you want to delete.

- Press OK.

- The Community will show up without the
delete user.

Create new Group
Groups are a very important tool in File Gateway. A correct implementation of a group can make the whole management process a whole much easier. Each group should correspond a unique set of users in a business unit. Users can belong to multiple groups but RTC cannot change the groups for producer and consumers users once they have been instantiate with a routing channel. This way always make sure the groups used in a RTC are persistent and if more users are added in the routing channels they should be added to that group, the group definition must be as consistent as possible.
- Navigate to Groups on File Gateway.

- Hit Create.

- Input the name of the group.

- A success message is displayed. The result is an empty group.

- To add partners to a new created group hit added partners.

- Select the Group – User pair to be integrated, multiple users can be added at the same time by pressing ctrl. Press execute to complete.

- A report will be shown.

- The new user can be listed in the by pressing the group name.

Groups are a very important tool in File Gateway. A correct implementation of a group can make the whole management process a whole much easier. Each group should correspond a unique set of users in a business unit. Users can belong to multiple groups but RTC cannot change the groups for producer and consumers users once they have been instantiate with a routing channel. This way always make sure the groups used in a RTC are persistent and if more users are added in the routing channels they should be added to that group, the group definition must be as consistent as possible.
Groups are also used to broadcasting. This enable a user to upload the file just to one mailbox and that file will be delivered to all the users in the target group, it enable one to many cardinality connections.
To create a new group follow the steps bellow.
- Navigate to Groups on File Gateway.
- Hit Create.
- Input the name of the group.
- A success message is displayed. The result is an empty group.
- To add partners to a new created group hit added partners.
- Select the Group – User pair to be integrated, multiple users can be added at the same time by pressing ctrl. Press execute to complete.
- A report will be shown.
- The new user can be listed in the by pressing the group name.
Delete a Mailbox
In some situation the system doesn’t
automaticly removes the Mailboxes even after the channel delition. To keep an
organized interface for the end user it migh be required to delete a mailbox
manually.
- In this
scenerio a channel is deleted but the mailbox is still available for the
user in myFileGateway upload menu and in the system. Start by deleting the
route.

- It can be
checked that the mailbox is still in the system.

- From FileGateway navigate to B2B Console.

- Navigate
Deployment > Mailboxes > Configuration. Search the mailbox you want
to delete.

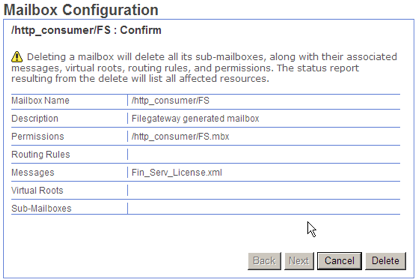
- Hit delete
for the mailbox.

- The system will display a series of warnings, it is a good pratice to
save a backup of the community before completing the delete. Check export
resources to do that. This will normally be a problem as long as the
mailbox is not in use by any channel.
- A sucessfull
message should appear.

Sem comentários:
Enviar um comentário