sexta-feira, 23 de janeiro de 2015

Sterling B2B Integrator Enveloping an EDI message Part 3 - Use a Business Process for immediate enveloping

In this step we will be implementing a BP that receives a valid EDIFACT message body and outputs the enveloped document in the Document Area after the EDIFACT Envelope step.

We are using this message as the input:

UCI+200905200086+SENDER+RECEIVER+7'
UCM+905201914+IFTMBC:D:99B:UN+4++FTX'
UCS+8+15'
UCM+905201915+IFTMBC:D:99B:UN+4++FTX'
UCS+8+7'

This is a typical CONTRL message without the enveloping fields.

This is the BPEL for the BP.

And the in GPM representation bellow, note that the EDI Encoder takes the Accepter Lookup Alias, and has the mode set gas Immediate.

In the first assigns we add some elements to override envelope settings with Sender and Recipient IDs, and the interchange number, check the BPEL.

Note that both the Correlation Service and the EDI Encoder are required steps for the enveloping process.

The resulting document can be handled in services after the EDIFACT Envelope, with services like File System Adapter or whatever it is required, you can also specify a BP to be trigger once the document is enveloped.

The BP output can be seen in the next screen with the enveloped message in document area, note the interchange number as it was specified in the BPEL and overridden at the envelope level.


Sterling B2B Integrator Enveloping an EDI message Part 2 - Creating the UNH envelope

In this enveloping procedure the intermediary group (UNG) envelope will not be implement as it is not required per EDIFACT standard not it would bring any additional value to the tutorial.

We will proceed with the creation of the UNH envelope, and you can see how it is correlated with the UNB level and how the envelope chain is implemented. As in the UNB level this envelope will be implemented with a wildcard * for the sender and recipient fields, making this a generic use envelope.

The message type is again CONTRL for it's simplicity although in this case the message type doesn't make that much difference the procedure will always be the same.

1. Navigate Trading Partner > Document Envelopes > Envelopes and select New Envelope Go. Select the EDIFACT Standard.

2. Select the Outbound UNH level.


3. Give it a meaningful name GENERIC_UNH_UNT_ENVELOPE_OUTBOUND


 4. As said we are leaving the Sender ID and the Recipient ID with the wildcard *.  The envelope chain is set in the Next Envelope setting, which uses the UNB envelope build in the first part of the tutorial. One could start implementing the envelopes starting in the UNH level and selecting Create Next Envelope, this is just a way of doing it won't make any practical difference in terms of implementation.

This are the required parameters to build the envelope message.
Message Type: CONTRL
Message Version Number: 2
Message Release Number: 1
Controlling Agency, Coded: UN

There is an extra setting using in the Business Process to specify that this is the envelope that we want to use, this allows to create identical envelopes for different situations if you need so. It is used in EDI Encoder service at BP level.
Accepter Lookup Alias: CONTRL_2_1_UN

Some other field to consider. 
Limit Interchange Size -> can leave it with default settings or adjust to requirements, it's the max allowed size for interchange messages.
Use Correlation Overrides -> we want it to be Always and will be taking advantage of it on the next tutorial step in the Correlation Service.


5. Set how to generate the Reference Number.


6.  One can map and carry with both translation, validation and enveloping in the same step but this will be  out of this tutorial scope, nevertheless you can specify NONE as the map to use in the next step.

7. Select the details for message enrichment, as said in point 6. If map is NONE the values of Validate translation input and output will be ignored.


 8. Finally specify the security settings, which will be leave as none in this tutorial.

9. Confirm, Finish and proceed to step 3 of the tutorial where we are going to see how to use the enveloping in the BPs.


quinta-feira, 22 de janeiro de 2015

webMethods and other servers Java Memory Settings

The purpose of this entry is to identify the meaning of the java memory settings for the IS services/processes.

Java heap refers to the volatile part of the memory, in the context of the wM IS documents instances or service execution and other IS objects will use this part of the memory. By definition
The Java heap is where the objects of a Java program live. It is a repository for live objects, dead objects, and free memory. When an object can no longer be reached from any pointer in the running program, it is considered "garbage" and ready for collection.
and IS is very large Java program dedicated to real time message processing which means it has a very dynamic a continuously reshaping memory structure.

Has specified in the documentation Java Heap can be set in the setenv.bat/sh and there are two parameters:


JAVA_MIN_MEM  -> Defaults to 256MB

JAVA_MAX_MEM  -> Defaults to 1024MB 

The JAVA_MIN_MEM is the memory that IS is starts with, and that will be the reference to calculate the heap space available at each GC (GC) iteration.

The JAVA_MAX_MEM refers to max memory the IS will use before triggering the garbage collector.


  • Why not to keep this values the same?
If this values are the same then the JVM will have a constant value for the heap memory, the disadvantage of this is that the GC takes more time to collect the death objects the bigger the heap is, in the limit IS might become irresponsive.

Lower heap might conduct to shorter GC while big heaps can lead to longer GC but less frequent.

Why not to keep JAVA_MIN_MEM to zero?

Because it takes resources to increase the heap size, the configuration as suggested is to use the lowest required memory at any time by the IS for the JAVA_MIN_MEM, and the biggest to the JAVA_MAX_MEN.


There is another memory component, the perm or permanent space, this is were the .class files are stored, it is the object factory that allows the generation of the instances used during runtime. 


By analogy you can compare heap space to the RAM in you're computer and the perm space to the hard drive. In wM terms I would say heap space is for run time memory requirements while perm space is related to services/documents/processes design.

The total amount of memory used in the OS will be the sum of 3 components, java heap + java perm + other (which is the smaller portion and is mostly related to JVM internal requirements to keep the java engine running).


  • Finally, why do we get the following errors?


  1. Out of memory error:java perm space
  2. Out of memory error:java heap space


1 Is quite easy to assert and you might see it happen on the wM IS env if you keep the default settings, as one build more packages and services, the available perm memory will be less and less at each new development until at last the space available to allocate new classes is not enough and we get the error number 1.

2 Is a bit more complex, the error is thrown when the garbage collector is unable to free up enough space to allow allocation to the requested object.

So basically when a new object is to be created and there is not enough space in the heap, the jvm will invoke the garbage collector. If after the gc completion, there is still not enough space freed up, then the jvm throws an OutOfMemoryError: java heap.

In highly inaccurate but comprehensive description if you have capacity to run 1000 IS services instances, when the heap reaches the 1000 services the GC will be started, if only 100 services instances are cleared and there are 200 in the queue voilá you have a java singularity :p and the error number 2 is triggered.

That's all good luck with you're machines tuning and will appreciate comments ;)

Some references:
Official wM documentation of course ;)
https://plumbr.eu/outofmemoryerror/java-heap-space
http://www.yourkit.com/docs/kb/sizes.jsp
http://www.coderanch.com/how-to/java/InvestigateOutOfMemoryError
http://www.coderanch.com/t/537313/Performance/java/memory-error-java-heap-space

sexta-feira, 24 de outubro de 2014

Oracle DB Using the GREATEST function with null dates/values

The GREATEST function allows to compare values of different n columns.

According to Oracle documentation:

GREATEST returns the greatest of the list of one or more expressions. Oracle Database uses the first expr to determine the return type. If the first expr is numeric, then Oracle determines the argument with the highest numeric precedence, implicitly converts the remaining arguments to that datatype before the comparison, and returns that datatype. If the first expr is not numeric, then each expr after the first is implicitly converted to the datatype of the first exprbefore the comparison.
Oracle Database compares each expr using nonpadded comparison semantics. The comparison is binary by default and is linguistic if the NLS_COMP parameter is set to LINGUISTIC. Character comparison is based on the numerical codes of the characters in the database character set and is performed on whole strings treated as one sequence of bytes, rather than character by character. If the value returned by this function is character data, then its datatype is alwaysVARCHAR2.
 And this are some sample usages:

GREATEST(2, 5, 12, 3)
Result: 12

GREATEST('2', '5', '12', '3')
Result: '5'

GREATEST( 09/21/2013, 01/02/2012, 09/21/2013) -- columns typed as dates
Result: 09/21/2013

GREATEST('apples', 'applis', 'applas')
Result: 'applis'
The problem emerges when trying to a null value:

GREATEST( 09/21/2013, NULL, 09/21/2013) -- columns typed as dates
Result: NULL            

GREATEST('apples', 'applis', NULL)
Result: NULL            
To avoid this you can use the NVL() function that replaces a NULL value with a string. If you are handling dates then after that conversion you still need to convert it to_date(). This is the query that will work if you're business only requires dates bigger than 1900-01-01.


Col A         Col  B          GREATEST_DATE
---------------------------------------
 NULL          NULL            NULL
 09-21-2013    01-02-2012      09-21-2013
 NULL          01-03-2013      01-03-2013 
 01-03-2013    NULL            01-03-2013
Col A         Col  B          GREATEST_DATE
---------------------------------------
 NULL          NULL            1900-01-01
 09-11-2013    01-02-2012      09-11-2013
 NULL          01-03-2013      01-03-2013 
 01-03-2013    NULL            01-03-2013

quarta-feira, 17 de setembro de 2014

webMethods Creating a business process with a task for approval Part 4 Update the business process and create a UI for the PO

Before continuing with this tutorial we'll be changing the published document in first part, instead of publishing the full content of the purchase order we'll be sticking to the PO number. We don't need to create this overhead on the process, it is good practice to only publish the metadata required to make the process working. In this case we only need the PO number all the other data can be accessed with this value from the database, remember BPM engine is not suitable to store data, add the least possible data in between activities and/or for process starting.

Next we are going to identify our business process logged custom id so that there is a relation between the process and the work order this is quite useful in practical scenarios and I use a small trick to achieve that will be showing bellow.

Finally we are going to create a UI portlet to display the PO data, this is another good practice method. This way instead of creating the same display in different tasks. Allot of times you need to show the same data in different task along extensive processes it is not developer friendly to make the same UI over and over the different tasks, instead we just use one portlet that gets parameters to display data, this are template portlets.

1.  Change the PublishPurchaseOrder to only publish the PurchaseOrderNumber field. We are doing this by dropping all other fields in a map step after data has been mapped to the database.


2.  Edit the PurchaseOrder document to have PurchaseOrderNumber as the only mandatory field. Do this by changing all the fields to required = false and if required make the document Linked to source = false. Also include a new field Approved that will hold the database variable for PurchaseOrder to be set accordingly to the task submission value (to be implemented later), this field is also non mandatory.


3.  To change the BP name first we are using the PRT customId log service available in the PUB package we will need to pass the value of the PO number to it. Create a folder utils under services and place the place the following BP on it.


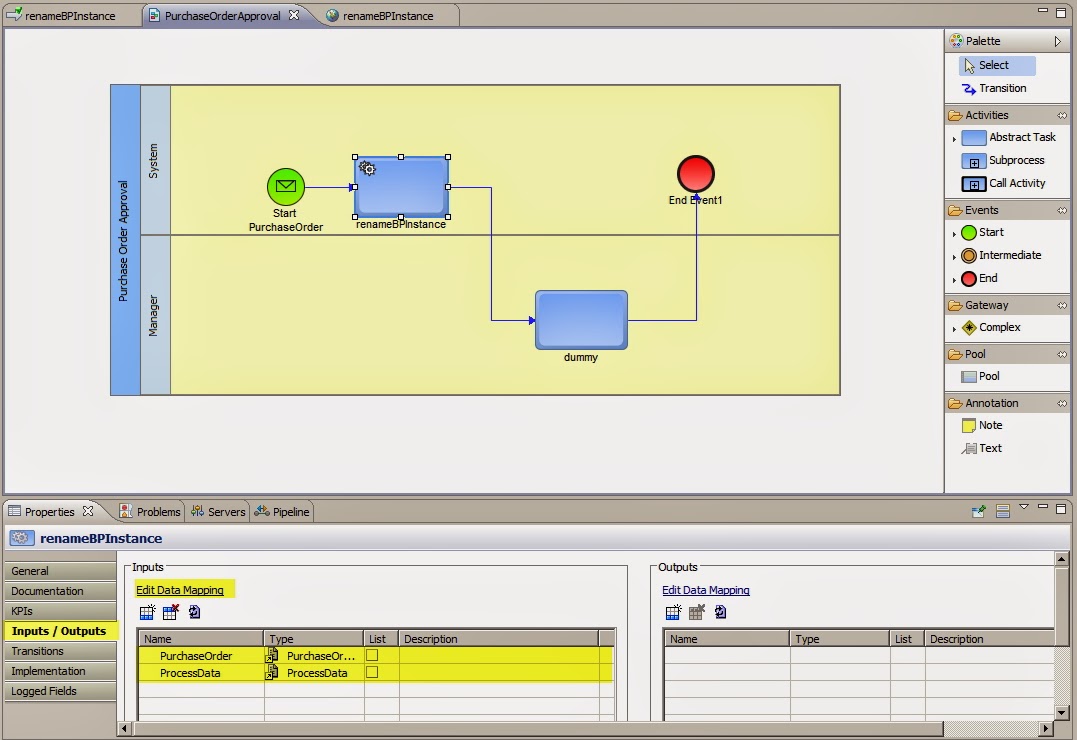
4.  Place this service as the first step of the PurchaseOrderApproval process. After opening the process switch to service view and drag the renameBPinstance. Make the connection as shown bellow, select the renameBPInstance activity and click Inputs/Outputs, check that PurchaseOrder and ProcessData documents are there.

Clicking Edit Data Mapping allows to map the process variables with the service inputs. The BPM engine will dynamically choose the most likely connections possible. 


5.  Rebuild the process and make a new request to deliverPurchaseOrder WS. Now the process instance will have a custom defined and searchable name.

6. On this last section we are generating the template for Purchase Order View. Start by changing to the UI Development perspective and second mouse click over User Interfaces > New Portlet Application follow the steps as documented in the screens bellow.


7.  Second mouse click over the PurchaseOrderApprovalPortlets folder under User Interfaces and select New Portlet. Follow the screens bellow to complete the portlet creation.


8.  We can finally start building the Purchase Order Details View. The first step is to create the select adapters under the adapters folder on the IS Demo_POApprovalProcess package.


9.  Having the adapters create a Business Process that will be responsible to populate a PurchaseOrder document. The definition is displayed bellow, it only receives the PurchaseOrderNumber as input and delivers a PurchaseOrder document that will the response to a WS defined in the next step.


10.  To make this service available to the portlet we need to generate a WS descriptor (getPurchaseOrder). Follow the same steps as described on the deliverPurchaseOrder_wsd. Make sure it is working once it has been implemented.


11.  To use the WS just drag and drop the getPurchaseOrder_wsd to the PurchaseOrderDetail default view. This will open a wizard that can be filled displayed bellow, this is basically generating the bean structure and the request interface in the portlet definition.


Once you completed the wizard the following structure should be displayed in the PurchaseOrderDetail default view, this is the default display in a view for a input/output WS Descriptor. You can see on the Bindings there is a Managed Bean structure that holds all the fields related to the WS. Later (on the next part) we will see how to dynamically use the bean inputs.


11.  Test the final deployment by running the portlet on MWS. You will require sysadmin permissions to do so and first the portlet needs to be deployed in the MWS server. To do so switch to the Servers tab, second mouse button over the server you are using click Add and Remove... and include the PurchaseOrderApprovalPortlets to the right side under configurable this will make the portlet publishable (that normally Eclipse will handle it automatically).


12.  Finally test the deployment by clicking the run button, this will open a new tab, you can either proceed with login (using sysadmin or equivalent credentials) or copy the link and open it in another browser.
 Notice the Refresh button at the bottom of the portlet.

13.  Finally rearrange the document structure to seem a bit more like a real world implementation this is the layout I have defined. Play a bit with this and note that you can drag the inputs from the bindings window and it will reflect in a input text box / display.


On the next part we will see how to use this view in a task and how to use the task in the business process and how it all connects together.